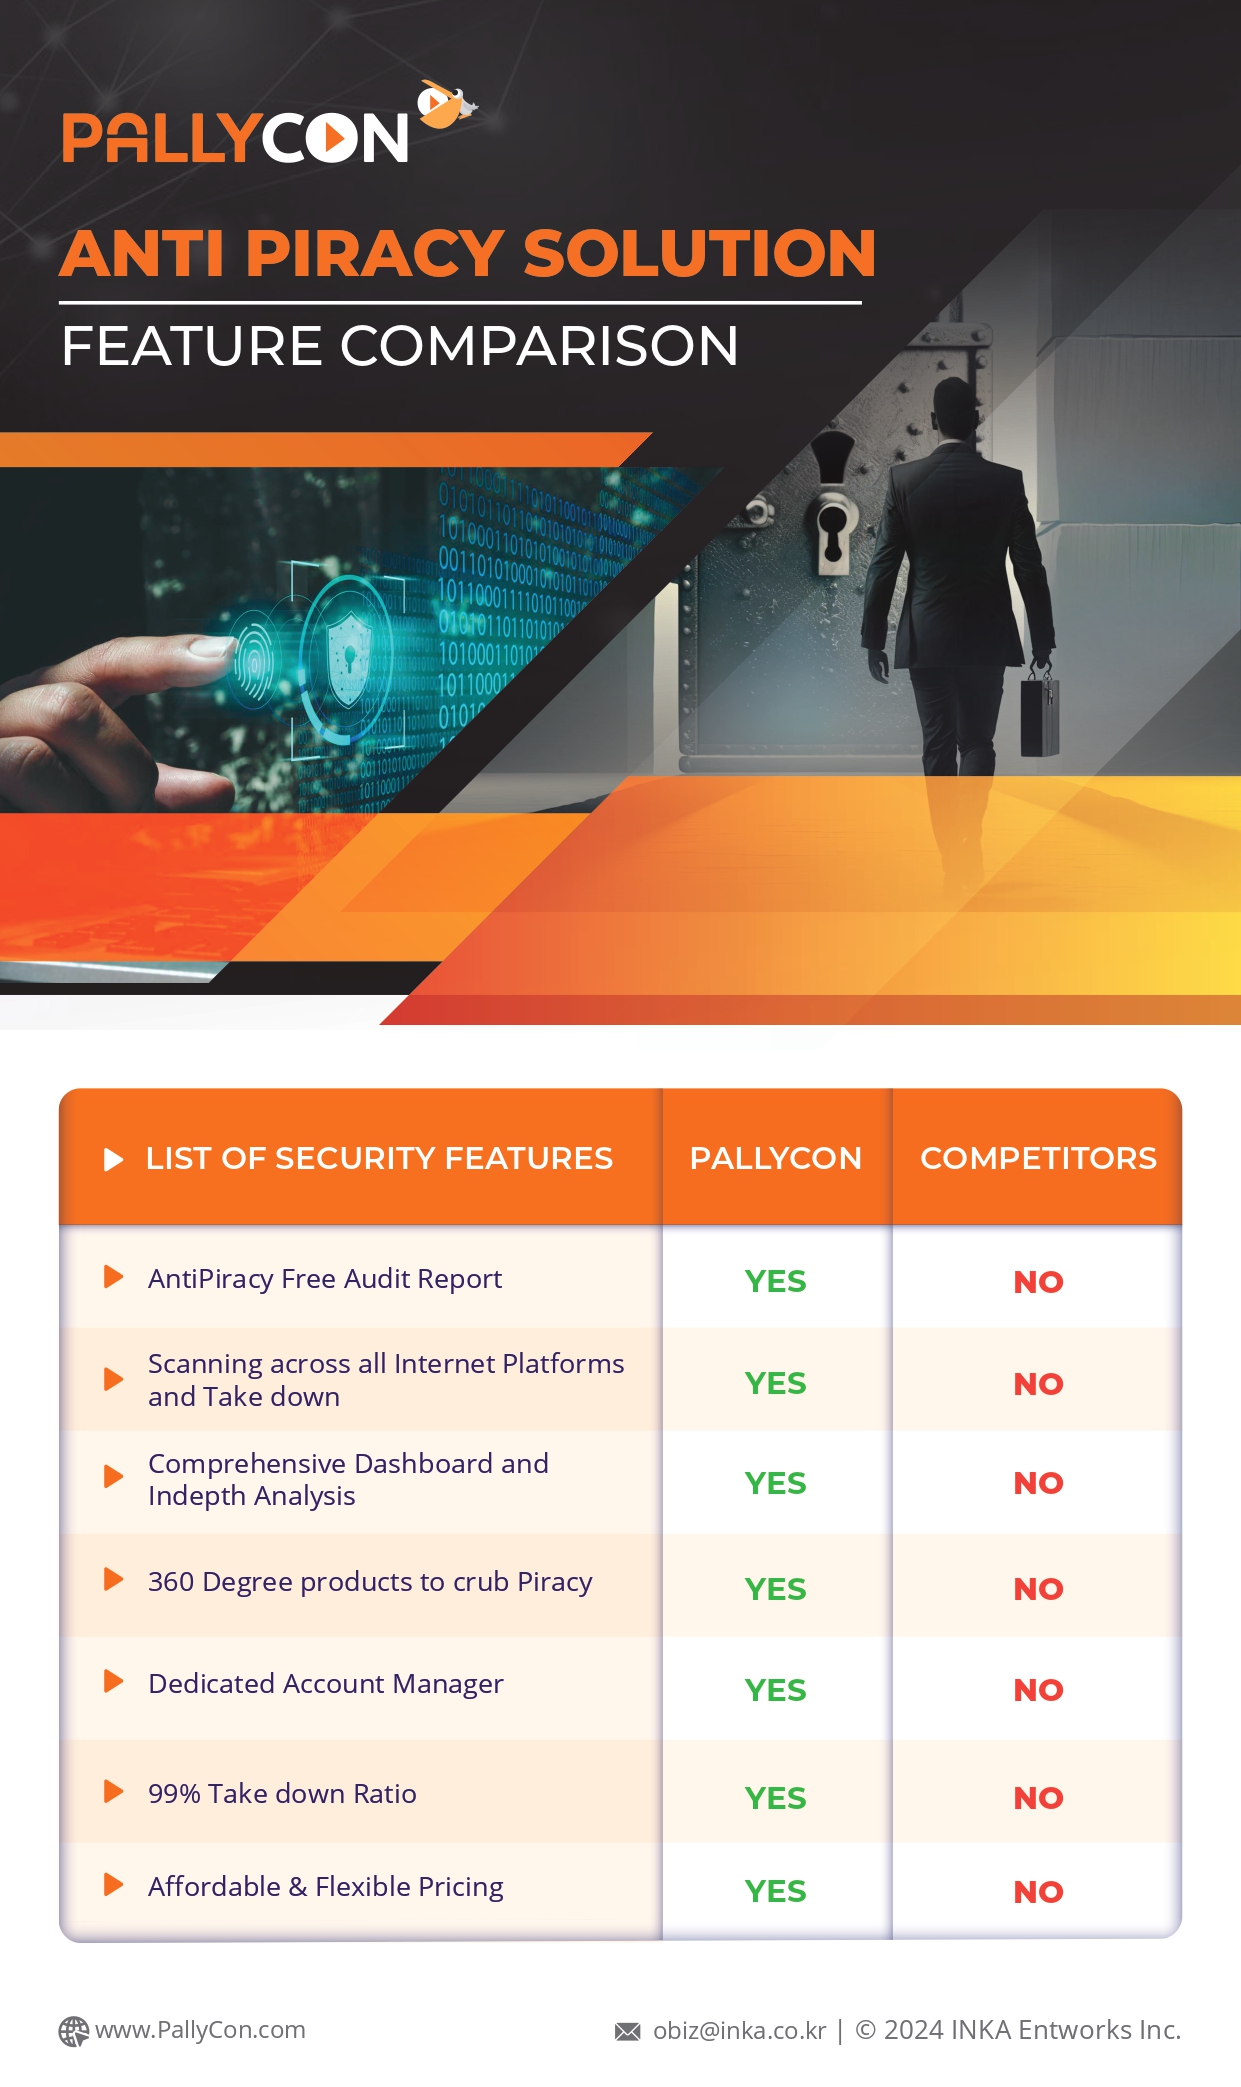
Know How to Apply Distributor Watermarking Using GCP
With the advent of latest technology the content creators are looking for simple, affordable technology solutions to safeguard their contents against online piracy. According to reports video piracy is on the rise and is costing a loss of millions and billions of dollars every year.
Though there are different ways of preventing piracy the most effective one is the Multi-DRM and forensic watermarking.
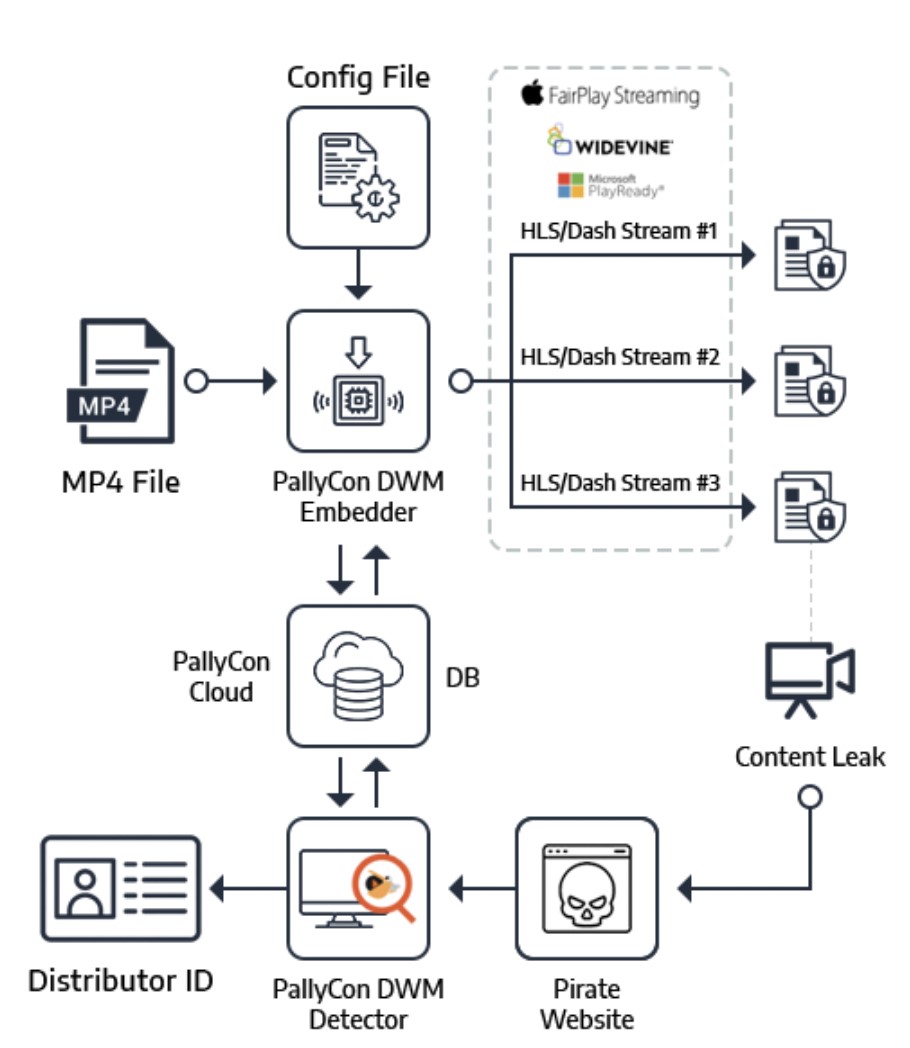
Content creators/owners/product houses need to share the content with different groups for editing, reviewing and if it gets leaked before the release, a huge loss is incurred . PallyCon’s Distributor watermark which is movielab compliant solution and completed the Cartesian robustness test is an ideal product to identify the source of leak and as its pre-integrated with Multi DRM ideal for streaming for limited audience . This product’s uniqueness is to extract watermarks from even shorter content and supports single frame detection i.e. if a scene is captured using a camera, the source from which it was captured can be identified.
In this blog below we will be demonstrating how simple and easy it is to set up an instance on GCP and watermark the content.
The solution provided is cloud agnostic, simple to set up and cost effective. For pricing please contact: obiz@inka.co.kr
Steps involved in securing the content
For details on the architecture please visit the page:
https://pallycon.com/docs/en/other-products/distributor-watermarking-guide/
There are basically 3 major steps involved right from configuring the GCP, setting up the machine and applying watermarking. The details are as mentioned below.
Step 1: Getting started with GCP
- Signup with GCP and create a account
- The setup configuration required for Distributor watermarking solution are as follows:
Hardware Requirements Intel CPU, RAM 8GB+, NVIDIA GPU with CUDA acceleration support Software Requirements Ubuntu 18.04, 20.04 or CentOS 7, NVIDIA CUDA Toolkit 9.1 or later - The above mentioned configuration required for the Distributor watermarking (DWM) not available as part of GCP free tier, hence get in touch with google customer support .
Step 2: Machine setup
- Log on to your account
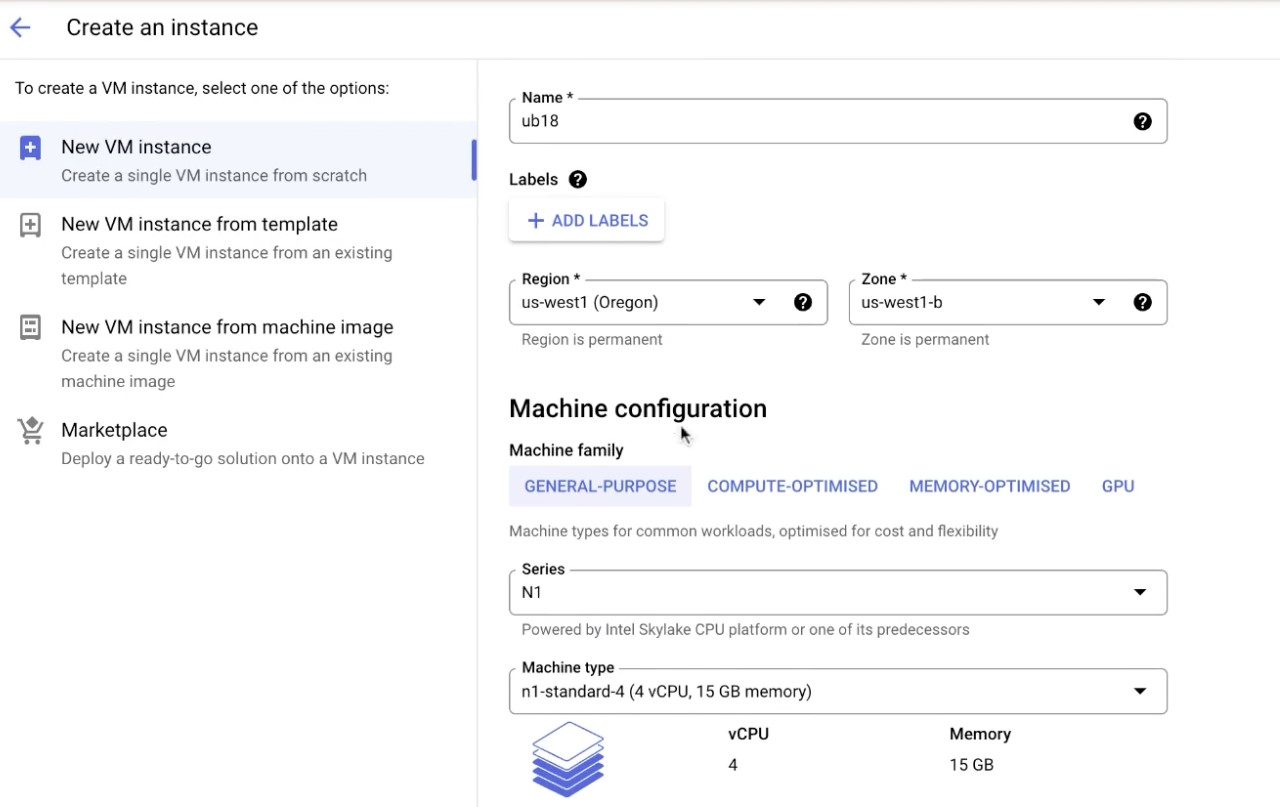
- Navigate to “Compute Engine” -> New VM InstanceThe screen would look like this .
- Set the instance Name
- Select the Region and zone
- Select the series as N1
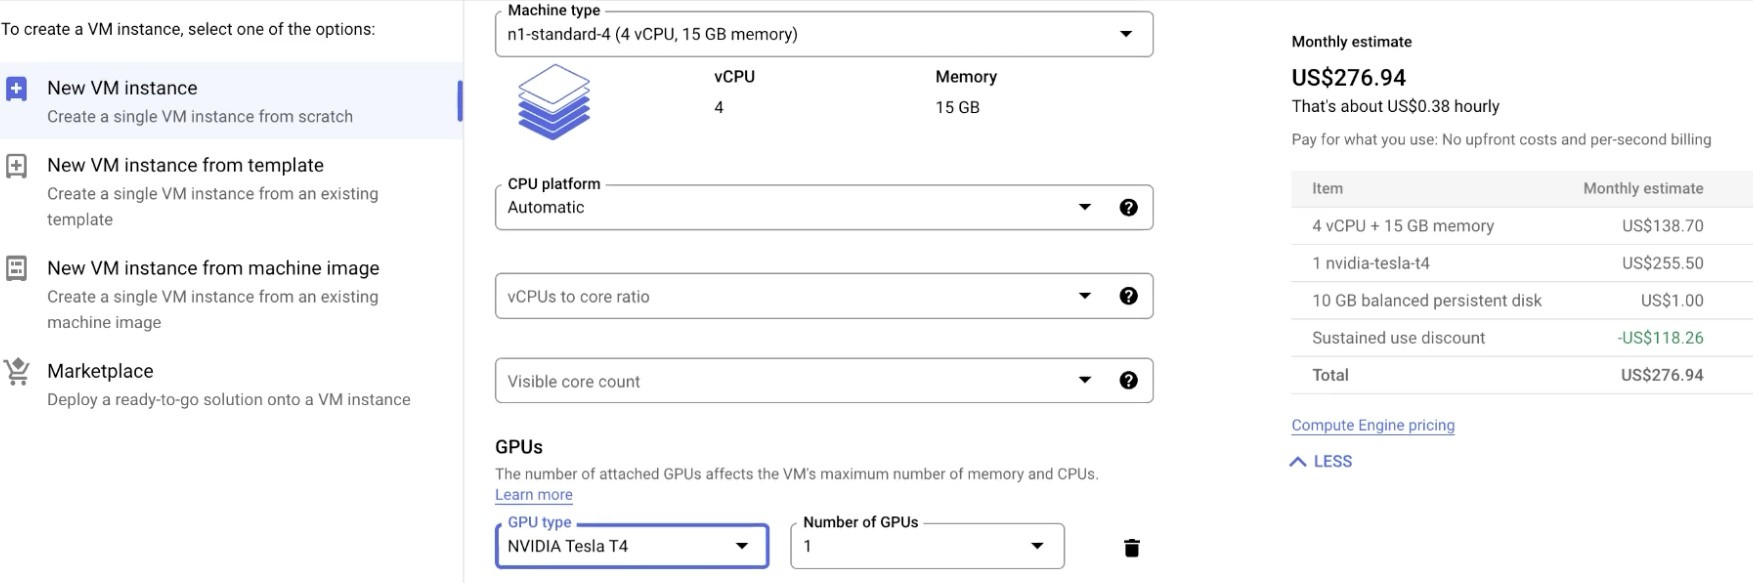
- Machine type n1-standard-4 (4vCPU, 15GB Memory)
- Select the GPU, set it to NVIDIA Tesla T4 and number of GPUs to 1. The cost of this setup would be $0.38 hourly.
- Once the GPU is set, scroll down to the “Boot disk” section
- Click on the “Change” button
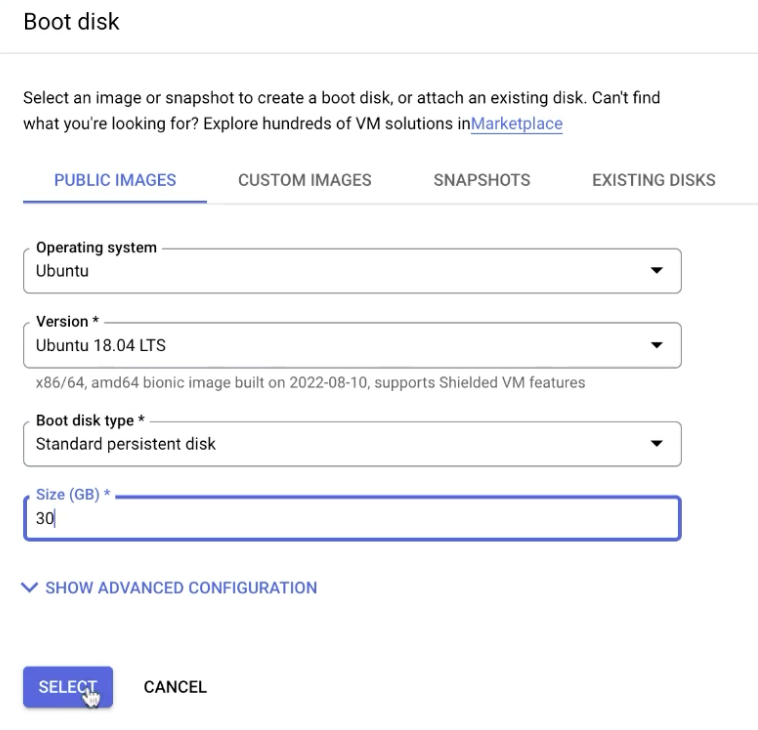
- Set the operating system as Ubuntu,
- Version 18.04 or 20.04
- Set the boot disk type to Standard persistent disk
- Set size to minimum 30GB
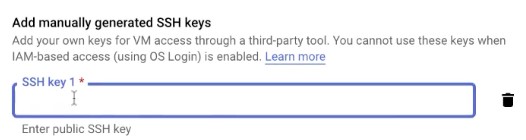
- Now Navigate to the Advanced options->Security->Manage Access-> Add manually generated SSH keys option to add SSH keys. The details about generating and adding SSH keys are document on https://cloud.google.com/compute/docs/connect/create-ssh-keys
- Now click on the “Create” button to create the instance

- Under the Instances tab the new created instance would be seen with internal and external IP addresses
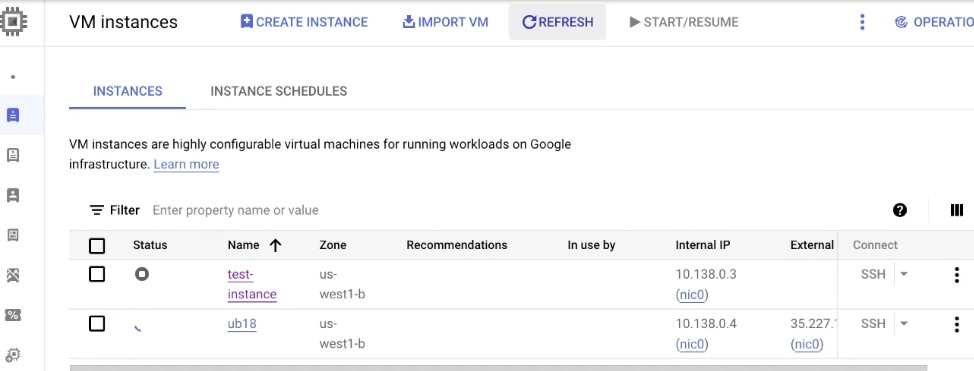
- Click on the Connect “SSH” option and ensure the system is up and running
Step 3: Applying watermark
Adding recipient
Now that the system is set up and ready let’s try to watermark the content.
First thing before applying watermark is adding the list of recipients whom the watermarked content would be delivered to. This information helps for watermarking and tracing the source of leak
- Register for PallyCon watermarking product if you are just validate then register for 30 days free trial account
- Login to the PallyCon Portal
- Navigate to Distributor watermarking-> DWM recipient section as shown below
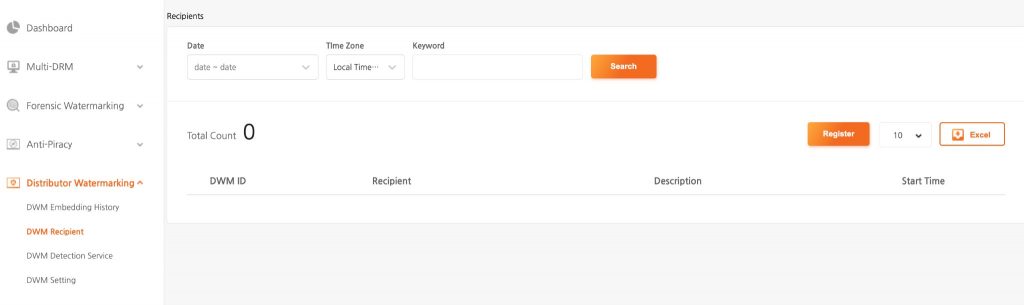
- Click on “Register” for adding recipient
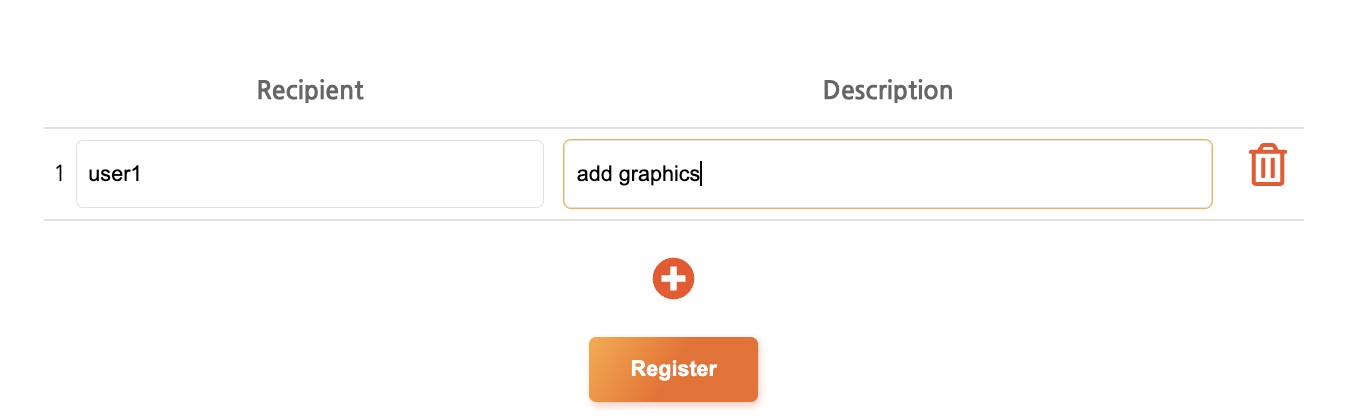
- Enter the recipient name, description and hit the Register button. In case there is a big list of recipients, create a csv or xls file and upload.
- The added recipients list would be shown on console as below:
- Now that the recipient is added you can apply watermark and distribute
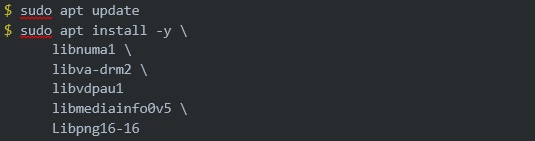
Libraries install
Now that the instance is up and running, let’s try to ssh through your local machine and install the necessary libraries
Connect to Compute Engine Instance using below command
ssh -i PATH_TO_PRIVATE_KEY USERNAME@EXTERNAL_IP
Note:
If there is an error “Are you sure you want to continue connecting (yes/no/[fingerprint])? Host key verification failed.”
Then set StrictHostKeyChecking to “no”
![]()
Also advisable to download the google command line on your host system:
https://cloud.google.com/sdk/docs/install-sdk
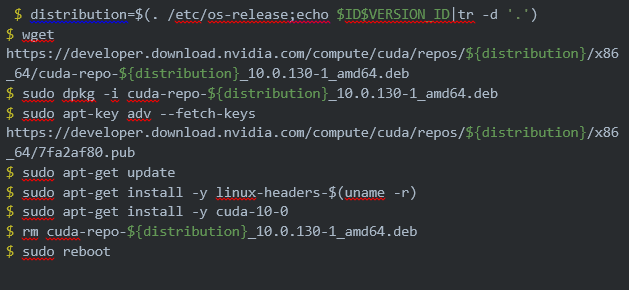
Start installing the necessary libraries as per the Ubuntu version this has been mentioned on https://pallycon.com/docs/en/other-products/distributor-watermarking-guide/ as well.
For 18.04 NVIDIA CUDA toolkit installation
- Verify if the Cuda driver is properly installed

- Install the dependencies
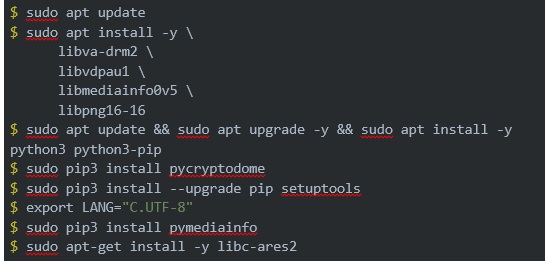
For 20.04 NVIDIA CUDA Toolkit installation
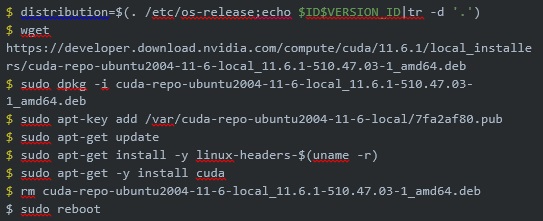
- Verify if the Cuda driver is properly installed

- Install the dependencies
Applying watermark
- Get the DWM Pre-embedding library by making a request to PallyCon customer service
- Upload the DWM Pre-embedder tar file on the GCP VM using the following command

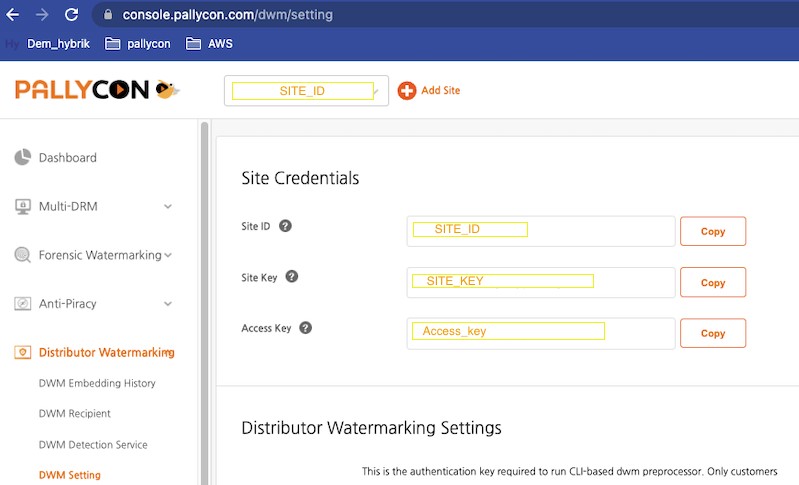
- Create the credential file

- Enter the site_id, site_key and access_key from the PallyCon Console.
- Configure the Job file
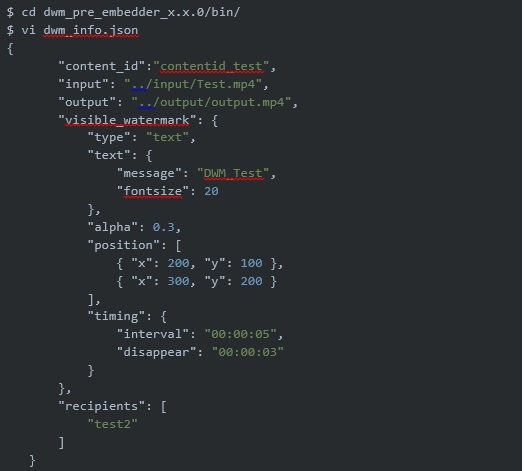
For additional details about the file parameters visit: https://pallycon.com/docs/en/other-products/distributor-watermarking-guide/#create-job-file - Now run your first pre-embedding job

- If you want to apply DWM,DRM and generate streaming format DASH then use the following command

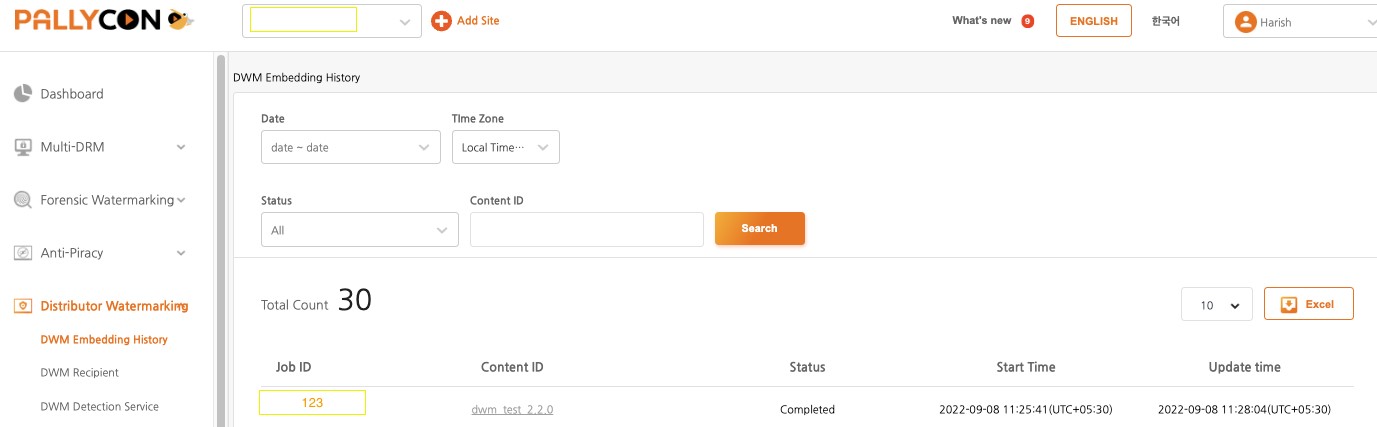
- Once the packaging is successful on the console the packaging history can be viewed
Step 4: Detection step
Let’s say there is an illegal copy of the original content and the source of leak needs to be identified. Then follow the steps below to detect
- Upload the illegal copy on any shared location like S3, dropbox etc with public access
- Log on to PallyCon Console and navigate to Distributor watermarking->DWM detection service
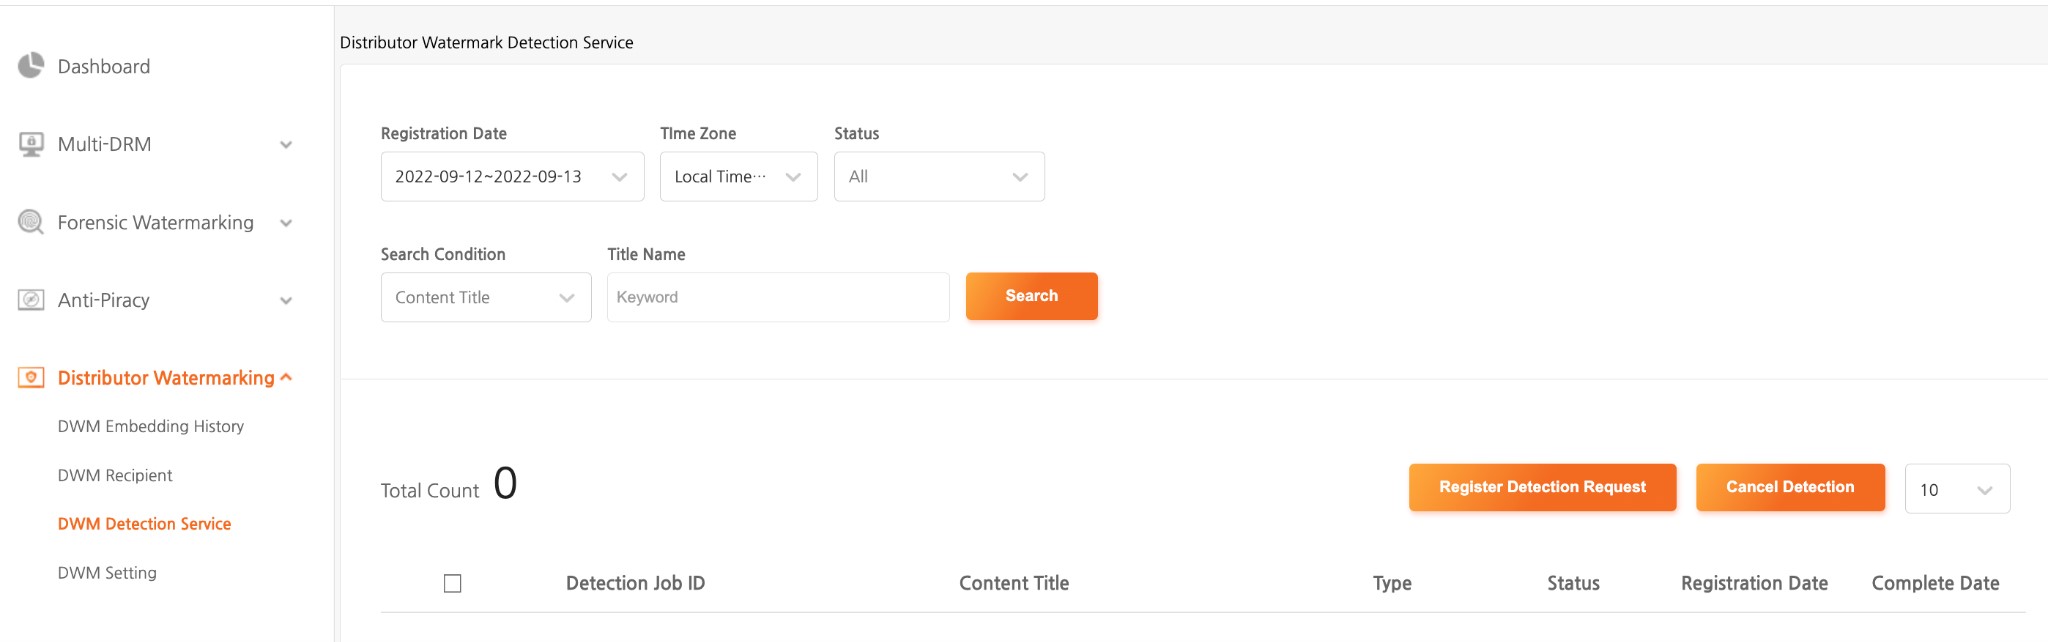
- Click on the “Register Detection Request”
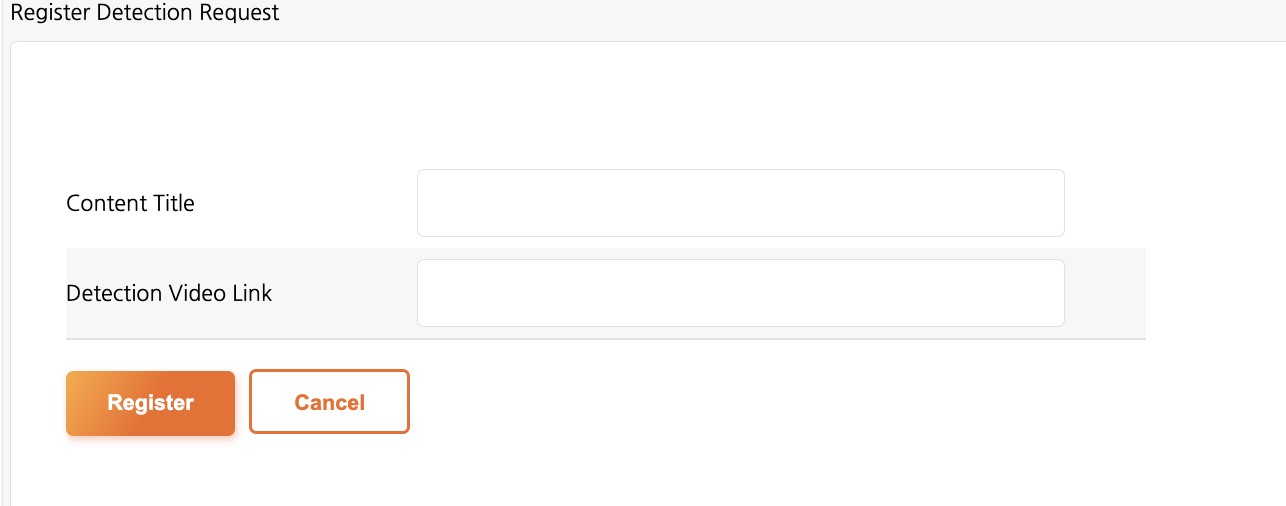
- Provide the Details and click the Register button
- Once the detection process is complete the result will be displayed on console
Conclusion:
Just following a few simple steps we could see how easy it is to apply a watermark and find the source of the leak . The technology is robust enough to different attacks and has been audited by the Farncombe Cartesian robustness test providing more confidence . Please contact PallyCon for creating a Trial account and try hands on with the product.

Harish Bhat is a Forensic watermark Product Manager at PallyCon and has been associated with media and broadcasting industry for over 13 years. Apart from technical writing, an avid reader of latest trends in the streaming world and content protection.