Multi-DRM Quick Start
Overview
This document guides you through content packaging and DRM license integration for playback for a quick experience of DoveRunner Multi-DRM service.
Quick Start consists of three steps: The simplest and fastest way to follow is the process of playing DRM content in an HTML5 player with the DoveRunner CLI packager and license token integration.
- Step 1: Sign up for a DoveRunner trial account and prepare a test web server
- Step 2: Packaging DRM Content with the DoveRunner CLI Packager
- Step 3: License token generation and DRM content playback through DevConsole site
Please refer to the following link for detailed information about DoveRunner CLI packager and license token integration.
- DoveRunner CLI Packager Guide: https://doverunner.com/docs/en/multidrm/packaging/cli-packager/
- License Token Guide: https://doverunner.com/docs/en/multidrm/license/license-token/
Step 1 - Sign up for a DoveRunner trial
Quick Start requires a trial account on the DoveRunner service site. If you haven’t signed up for the DoveRunner service yet, here’s how to create an account:
1-1. DoveRunner Multi-DRM trial sign up
Go to the DoveRunner console site login page and click on the ‘Sign up’ button. Fill out the sign up form as shown below and click the ‘Sign Up’ button.
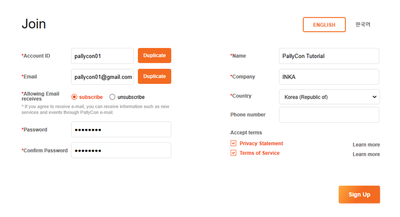
DoveRunner Console : This is a site where various settings and inquiries regarding DoveRunner service subscription and integration can be performed. You will need to verify your email after joining the site. Newly signed up accounts will be automatically applied to the trial plan. Go to DoveRunner Console
1-2. Verify the email account for DoveRunner trial site
You will receive the welcome email on your email account used for the sign up. Click the ‘Verify’ button to verify your email. The trial site on DoveRunner service will be created after the verification.
1-3. Check the trial site information
Sign in to DoveRunner Console site and go to DRM Settings page under Multi-DRM menu. Copy and paste the Site ID, Site Key, and Access Key values on a text editor such as Notepad. Also, copy the KMS Token value in the Multi DRM Settings section as well.
These values will be used in later stages for the DRM integration.
1-4. Preparing a test web server
To test the playback of DRM content, you need a web server to upload the content files. Prepare a web server that allows access from the external Internet and has an SSL certificate installed so that the content files can be accessed by HTTPS URL from any location.
If you have difficulty preparing a separate test web server, you may try using cloud infrastructure services such as
AWS,Azure. Or you can take advantage of free HTTPS hosting provided by cloud platforms such as Netlify or Heroku.
Step 2 - Package DRM content using DoveRunner CLI Packager
You need to package a video to test DRM content playback on the player. Follow the below guide to perform DRM content packaging.
2-1. Download and install DoveRunner CLI Packager
Download DoveRunner CLI Packager from Packager and Sample Downloads page. Create a folder on a test PC or server to perform the content packaging. And copy the CLI executable file located in bin folder of the downloaded zip file. (e.g. ~/doverunner-test/DoveRunnerPackager)
DoveRunner CLI Packager supports 64bit Windows and Linux(Ubuntu, CentOS) OS. Gcc and g++ libraries (6.0 or later) are required for Linux OS.
2-2. Package plain MP4 video to MPEG-DASH content
Copy an MP4(H264 AVC) video file for the test to the same folder as the DoveRunner CLI Packager executable. You can use the DoveRunner introduction video linked below if you want.
DoveRunner introduction video : https://doverunner.com/docs/files/pallycon-intro.mp4
DoveRunner CLI Packager supports
DASH-CENC(Widevine, PlayReady) andHLS-AES(FairPlay) packaging for multi-DRM, as well as NCG and NCG-HLS packaging functions for Netsync Content Guard (NCG) DRM. In this tutorial, we will only proceed with DASH-CENC packaging for a brief test.
Run the command as below to perform a DASH content packaging. Please refer to the below table for the details about each parameters.
./DoveRunnerPackager --enc_token --content_id --dash -i -o
| Parameter | Input value | Specification | Example |
|---|---|---|---|
--enc_token |
KMS token value used for CPIX API communication with DoveRunner KMS. | String | eyJhY2Nlc3Nfa2V5Ijoic05nMmF5UEXRlX2lkIjoiMFROQyJ9 |
--content_id |
Unique ID of content to distinguish each content when DRM packaging and licensing. The DRM encryption key and license are managed based on the ID, and the content ID managed by the CMS (Content Management System) is generally input. | Max 200 alphanumeric characters | doverunner-intro |
-i |
The name of the original MP4 file to be packaged. If the package is in a different path from the executable file, enter the file name including the path. | Path of a file | ~/doverunner-test/input/doverunner-intro.mp4 |
-o |
The path of output folder | Path of a folder | ~/doverunner-test/output/doverunner-intro/ |
If the command is configured according to the input value shown above, it is as follows. The site ID and the access key, which are shown as examples, do not actually work, and you must replace them with the values that correspond to the account you joined in Step 1.
./DoveRunnerPackager --enc_token eyJhY2Nlc3Nfa2V5Ijoic05nMmF5UEXRlX2lkIjoiMFROQyJ9 --content_id doverunner-intro --dash -i ~/doverunner-test/input/doverunner-intro.mp4 -o ~/doverunner-test/output/doverunner-intro/
After the packaging is successfully completed, the history will be displayed on the DRM Packaging History page of the DoveRunner console.
2-3. Upload the packaged DASH content on a test web server
When packaging is complete, an MPEG-DASH content is created, consisting of an mpd manifest file and audio / video tracks in the dash folder in the output folder. To test DRM content playback in Step 3, you must upload the folder to the test web server. Upload DASH content to the storage associated with the CDN or to a typical web server.
Browsers such as Chrome and Firefox are forced to apply HTTPS to all URLs related to media streaming for security reasons. For the playback testing in step 3, you must apply an SSL certificate to your test web server and use an HTTPS URL.
Step 3 - Generate license tokens and play DRM content
DoveRunner DevConsole page provides various test functions to help develop DRM integration. Follow the steps below to generate the tokens required to issue a DRM license and play the DRM content you packaged in Step 2.
3-1. Generate DRM license token
In order to play the packaged content, the DRM license must be issued to the player through DRM license integration. DoveRunner Multi DRM supports token or proxy type licensing, and in this tutorial we will proceed with token licensing.
For detailed instructions on how to issue licenses, please refer to the online guide linked below.
- DRM license integration guide : https://doverunner.com/docs/en/multidrm/license/
The token used in the license request must be generated in accordance with the specifications in the server side (backend) of the video service to which DoveRunner Multi-DRM will be applied.
In this tutorial, you will use the Create token function provided on the Developer Console page of the DoveRunner site for quick testing. Go to the Developer Console page at the link below and enter the below items on the form.
Create tokentest page: https://devconsole.doverunner.com/drm-tools/license-token/#token-generator
| Item | Input value | Specification | Example |
|---|---|---|---|
| SITE ID | The trial site ID which is shown on Integration Settings page of DoveRunner Console site. |
Four uppercase alphabet characters | ABCD |
| SITE Key | The site key string which is shown on Integration Settings page of DoveRunner Console site. |
32-length characters | 3H24FS8wdo3C7CWrSjcIhPYWpYaFu6Lh |
| ACCESS Key | The access key string which is shown on Integration Settings page of DoveRunner Console site. |
32-length characters | gktt7xArRiSrWXEvrommuBdUD6Ktk3cP |
| DRM Type | The name of DRM which is supported by client web browser | Widevine / PlayReady / FairPlay | Chrome/FireFox: Widevine, IE11/Edge: PlayReady |
| CID | The content ID which was input to CLI packager in Step 2. | Max 200 alphanumeric characters | doverunner-intro |
| USER ID | A unique user ID used to verify the rights of the content service user. In the token-based license integration, a token must be generated after the authorization check is completed between the content service backend and the client. | Max 200 alphanumeric characters | test-user |
| Time stamp | The validity time of the token. Generally, it is set as token generation time, and the token is valid for 600 seconds after that point by default. The length of validity can be configured on DoveRunner Console site. | yyyy-mm-ddThh:mm:ssZ (GMT based) | 2019-04-03T08:30:00Z |
| Response Format | Response data type for token-based license requests (Choose original for this tutorial) |
original or json |
- original: Responds the actual license data according to the requested DRM specification- json: Responds in JSON format including the license data and additional information (client device ID, etc.) Can be used for token proxy or client SDK only. |
| Key Rotation | Set whether to enable key rotation for live streams (Choose false for this tutorial) |
true or false |
|
| Token Rule | DRM-related rule data to be applied when issuing license (refer to Token guide for details) | JSON String | {} |
Enter the values required for token creation as above and click the REQUEST TOKEN button to generate the token string. Copy the string and save it separately for the next step.
You need to input
DRM Typewith correct upper and lower cases. If you do not enter aTime stampentry, a token is generated based on the current time.
3-2. Play DRM content through HTML5 player
To test playback, go to DevConsole’s HTML5 Playback Test Page.
Enter the DASH URL and pallycon-customdata-v2 fields as shown below in the text boxes on the page.
- DASH URL: Enter the manifest file (.mpd) URL of the DASH content you uploaded to the test web server in step 2.
- pallycon-customdata-v2: Enter the license token string created in step 3-1
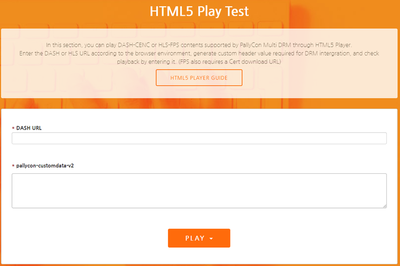
The input values in the above screenshot are examples of a demonstration content. In the actual quick start, the values created in the previous step must be entered.
If the above items are entered correctly, click the PLAY button to play the DRM content video at the bottom.
Error handling during playback
If an error occurs when trying to play the DRM content in step 3, you may check the following.
CORS settings for test web server
If the URL domains of the DRM content and the web player are different, cross-domain access must be allowed on the server where the content is uploaded.
Please refer to the following link for detailed explanation and handling of CORS errors that occur when this setting is not set.
- Cross-Origin Resource Sharing(CORS): https://developer.mozilla.org/en-US/docs/Web/HTTP/CORS
DRM type setting in license token
Verify that the web browser performing the playback test matches the DRM Type of the license token you set in step 3-1.
DRM Type should be entered as Widevine for Chrome / Firefox browser and PlayReady for IE11 / edge browser.
Check if license token expired
You cannot get a DRM license with an expired token. The token validity period is 10 minutes (600 seconds) from the time of creation by default. And this value can be adjusted in the Site Settings > Integration Settings screen of the DoveRunner console site.
Note: The token validity period is different from the validity period of the DRM license.
- Token validity period: The period during which DRM license can be issued with the token.
- License validity period: How long DRM content can be played with the license after the license is issued.
Next step
Congratulations! If you have progressed to this point, you have experienced the entire process required to apply DoveRunner MultiDRM service.
Please refer to the guides below to proceed to the next step.
- Content Packaging Guide: Guides you through various content packaging methods.
- License Integration Guide: This section describes how to integrate DRM licenses.
- Client Integration Guide: Instructions on how to play DRM content on various client devices.