Transcoding & Packaging Service Guide
This document is a user manual with steps for using DoveRunner’s new SaaS based Transcoding & Packaging service.
Overview
DoveRunner’s Transcoding & Packaging (T&P) service is a complete SaaS based solution to transcode, encrypt with Multi-DRM and apply forensic watermark in a single workflow.
This solution is easy to use, economical, compatible with players supporting Multi- DRM and reduces time to market without compromising on the quality of the video content.
This service supports a wide range of input videos to be transcoded with desired set of resolutions ready for streaming, thereby saving time and money. This service is aimed at customers who want to secure their content and stream it across a large audience quickly without any-coding.
Prerequisites
T&P service supports three types of job as follows. You must subscribe to at least one of DoveRunner multi-DRM and Forensic Watermarking service to use T&P service.
- Transcode & apply Forensic Watermark & DRM
- Transcode & apply DRM
- Transcode & apply Forensic Watermark
Tutorial Video
Step-by-Step Guide
Different steps involved in the Transcoding & Packaging are as follows:
- Step 1: Select an AWS region for transcoding job
- Step 2: Register Amazon S3 storages for input and output
- Step 3: Create a job with different content protection options
- Step 4: View job status and history
Step 1: Set Transcoding Region
After logging in to DoveRunner Console, go to the Setting screen of Transcoding & Packaging menu.
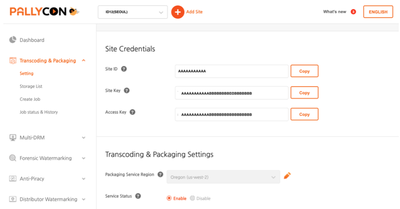
- Click on the pencil icon to edit the transcoding region.
- From the dropdown list, select a region you want to use for transcoding jobs.
At present 3 regions (Oregon,SeoulandSingapore) are supported (If a different region is required, please raise a helpdesk ticket).
Now that the region is set for transcoding, step 1 is complete and this step is common for all the 3 job types.
Step 2: Register Storages
Once the transcoding region is set, the next step is defining the AWS S3 bucket details where the input and output video files would be stored. Steps for the storage setting is as follows:
- Go to
Storage Listscreen under theTranscoding & Packagingmenu.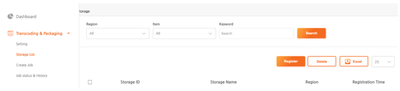
- Click on the
Registerbutton to open the storage registration screen.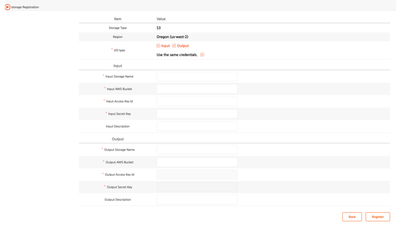
Tip: If you are registering the storage for the first time, select both
InputandOutputcheckbox as shown above. If the AWS access key and secret key for both storages are the same, then selectUse the same credentials.
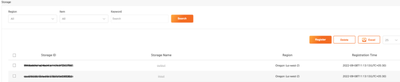
- Once the details are entered, click the
Registerbutton at the bottom of the screen. - If there is no issue in accessing the S3 bucket with the access key and secret key, the storage registration would be successful and the list would be populated as shown below.
Step 3: Create Job
This is the main step for creating the transcoding job and applying content protection.
You can apply either Forensic Watermarking or Multi-DRM or both according to your subscription type and content security requirements.
Before proceeding on this step, you need to first upload the content to be processed on the registered S3 bucket, then click on the Create Job submenu.
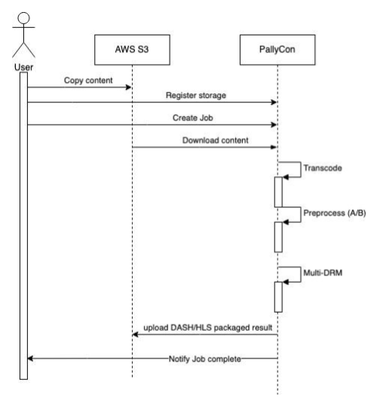
3.1 Transcode & apply Forensic Watermark & DRM
This option is valid only for customers subscribed for both DoveRunner’s Multi-DRM and Forensic Watermarking service.
- Copy the content to be transcoded and protected on the registered S3 bucket.
- On the DoveRunner Console, navigate to
Create Joboption under theTranscoding & Packagingmenu. - Select the job type as
Transcode & apply Forensic Watermark & DRM. - Complete all the 5 steps as mentioned in section 3.4 to provide necessary inputs.
- DoveRunner SaaS service transcodes the content, pre-processes to generate A/B variant, encrypts with Multi-DRM, packages it with DASH/HLS/CMAF and finally uploads the streaming ready content to the registered output folder on S3.
- After the job is registered, you can check the status and history.
Supported Specification
Input Format and Codec
| Format | Video Codec | Audio Codec |
|---|---|---|
| MPEG-4 | AVC(H.264), HEVC(H.265) | AAC, AAC_LC,AC3, EAC3, HEAAC_V2 |
Output Format and Codec
| Format | Video Codec | Audio Codec |
|---|---|---|
| DASH, HLS, CMAF | AVC(H.264), HEVC(H.265) | AAC, AAC_LC,AC3, EAC3, HEAAC_V2 |
3.2 Transcode & apply DRM
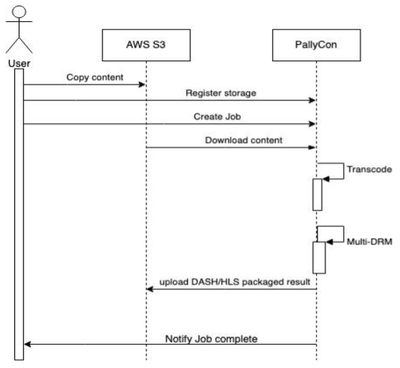
- Copy the content to be transcoded and protected on AWS S3 bucket.
- On DoveRunner Console, navigate to
Create Jobscreen underTranscoding & Packagingmenu. - Select the job type as
Transcode & apply DRM. - Complete all the 5 steps as mentioned in section 3.4 to provide necessary inputs.
- DoveRunner SaaS service transcodes the content, encrypts with Multi-DRM, packages it with DASH/HLS/ and finally uploads the streaming ready content to the registered output folder on S3.
- After the job is registered, you can check the status and history.
Supported Specification
Input Format and Codec
| Format | Video Codec | Audio Codec |
|---|---|---|
| IMF | Apple ProRes, JPEG 2000 (J2K) | aac_lc,aac, heaac_v1, heaac_v2,eac3, ac3, mp3, wav |
| Matroska (MKV) | AVC (H.264), PCM, MPEG-2, MPEG-4 part 2, VP9 | aac_lc,aac, heaac_v1, heaac_v2,eac3, ac3, mp3, wav |
| MPEG Program Streams (MPEG-PS) | MPEG-2 | aac_lc,aac, heaac_v1, heaac_v2,eac3, ac3, mp3, wav |
| MPEG Transport Streams (MPEG-TS) | AVC (H.264), HEVC (H.265), MPEG-2 | aac_lc,aac, heaac_v1, heaac_v2,eac3, ac3, mp3, wav |
| MPEG-1 System Streams | MPEG-1, MPEG-2 | aac_lc,aac, heaac_v1, heaac_v2,eac3, ac3, mp3, wav |
| MPEG-4 | Uncompressed, AVC Intra 50/100, H.261, H.262, H.263, AVC (H.264), HEVC (H.265), JPEG 2000, MPEG-2, MPEG-4 part 2 | aac_lc,aac, heaac_v1, heaac_v2,eac3, ac3, mp3, wav |
| MXF | Uncompressed, Apple ProRes , AVC Intra 50/100, VC-3, DV/DVCPRO, DV25, DV50, DVCPro HD, AVC (H.264), JPEG 2000 (J2K), MPEG-2, SonyXDCam, SonyXDCam MPEG-4 Proxy | aac_lc,aac, heaac_v1, heaac_v2,eac3, ac3, mp3, wav |
| QuickTime | Uncompressed, Apple ProRes , AVC Intra 50/100, DV/DVCPRO, H.263, AVC (H.264), HEVC (H.265), JPEG 2000 (J2K), MJPEG, MPEG-2, MPEG-4 part 2, QuickTime Animation (RLE), DNxHD | aac_lc,aac, heaac_v1, heaac_v2,eac3, ac3, mp3, wav |
Output Format and Codec
| Format | Video Codec | Audio Codec |
|---|---|---|
| DASH, HLS, CMAF | AVC(H.264), HEVC(H.265) | AAC, AAC_LC,AC3, EAC3, HEAAC_V2 |
3.3 Transcode & apply Forensic Watermark
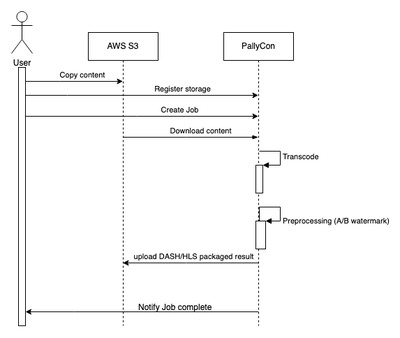
- Copy the content to be transcoded and protected on AWS S3 bucket.
- On DoveRunner Console, navigate to
Create Jobscreen underTranscoding & Packagingmenu. - Select the job type as
Transcode & apply Forensic Watermark. - Complete all the 5 steps as mentioned in section 3.4 to provide necessary inputs.
- DoveRunner SaaS service transcodes the content, pre-process to generate A/B variant, packages it with DASH/HLS/CMAF and finally uploads the streaming ready content to the registered output folder on S3.
- After the job is registered, you can check the status and history.
Supported Specification
Input Format and Codec
| Format | Video Codec | Audio Codec |
|---|---|---|
| MPEG-4 | AVC(H.264), HEVC(H.265) | AAC, AAC_LC,AC3, EAC3, HEAAC_V2 |
Output Format and Codec
| Format | Video Codec | Audio Codec |
|---|---|---|
| DASH, HLS, CMAF | AVC(H.264), HEVC(H.265) | AAC, AAC_LC,AC3, EAC3, HEAAC_V2 |
3.4 Job Creation Details
This section describes the job creation steps in detail.
Step 1/5: Job Type Selection
Select the Job type as per your content security requirement.

Step 2/5: Configure input and output storages
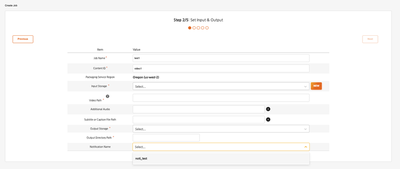
Job Name: Enter an arbitrary name to distinguish the job. (Special characters and spaces cannot be used, maximum 50 bytes)Content ID: Enter the unique ID (Content ID) of the content to be packaged. (Special characters cannot be used, maximum 200 bytes)Input Storage Name: Select the input storage from the list that you registered in the previous step.Video Path: Enter the path of the source video file (mp4) in the storage, excluding the bucket name. (For example,source/test1.mp4wheresourceis the folder name)Additional Audio: Additional audio path can be provided.Subtitle or Caption file path: If you are packaging with subtitles, upload the subtitle file for each language to the same input storage as the source video, then input the corresponding path. (supports WebVTT in Text, TTML in MP4, WebVTT in MP4 formats)Output Storage Name: Select the output storage you registered in the previous step from the list.Output Directory Path: Enter the output directory path where the final content would be uploaded.Notification Name: Enter the SNS name configured for TNP job status notification.
In case of trial account, following conditions are applicable:
- Video codec: H.264
- Container: MP4
- Audio codec: AAC included in the container
- Maximum Length of video: 10 min
- Output: DASH/HLS/CMAF with/without DRM encryption, multi-resolution
- Only 2 jobs allowed
- 1 video input with 1 audio track in the MP4 container. No separated audio or caption file input allowed. If multi audio tracks are present in the provided video file, an error message would be displayed.
- job type: FWM the minimum video length should be more than 5 mins
Limitations for commercial accounts are as below:
- Video codec: H.264/H.265
- Container: MP4 and MOV supported as of now for Forensic watermark related job
- Max number of audio: 10
- Max number of subtitles: 10
- Video Frame rate supported : [23.98 , 24.0 , 25.0 , 29.97 , 30.0]
- Only video with CFR (Constant Frame Rate) supported for Forensic watermark related jobs
- At present only 16:9 aspect ratio supported
Video Path, Additional Audio and Caption File Path are case-sensitive. Please make sure to enter the correct value to avoid errors.
Step 3/5: Video configuration
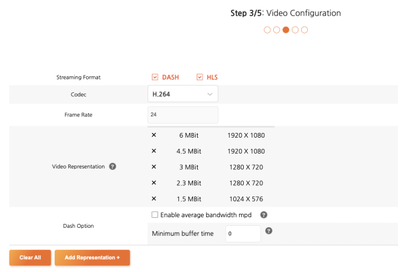
Streaming Format: Select the streaming format to be packaged. (DASH/HLS/CMAF).Codec: H.264 and H.265 supportedFrame Rate: Framerate of the input video displayed (Up to 30 fps supported currently)Video Representation: By default, 5 different resolution presets are available. The resolutions are modifiable.- Click the
Xbefore the resolution to delete - Click the
Add representationbutton to add new resolution - Enter the width, height, and bitrate values.
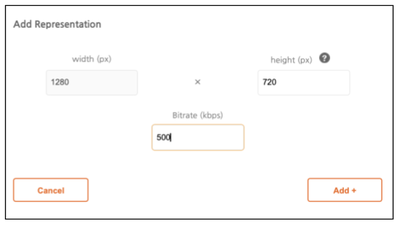
- Supported values:
- Width: Min = 416, Max = 3840
- Height: Min = 234, Max = 2160
- Bitrate(kbps): Minimum 10kbps, Maximum 100Mbps
- Click the
Enable average bandwidth mpd:Select this option if average bandwidth needs to be applied in mpdMinimum buffer time:Minimum time of initially buffered media that is needed to ensure smooth playout. (default: 2)
Current limitation on maximum number of resolution supported for each job are as follows:
DRM Only Job type:
- For H.264 codec : max up to 6 resolutions
Eg: [2HD, 2FHD, 2 UHD] or [1SD, 2HD, 2FHD, 1UHD]- For H.265 codec : up to 3 resolutions
Eg: [2UHD,1FHD] or [1UHD,1FHD,1HD]
FWM/FWM+DRM Job type:
- For H.264 codec : max up to 3 resolutions with UHD
Eg:[1UHD,1FHD,1HD]- For H.264 codec : max up to 5 resolutions without UHD
Eg:[2FHD,2HD,1SD]- For H.265 codec and FWM/FWM+DRM job type : up to 3 resolutions
Eg: [2UHD,1 FHD] or [1UHD,1FHD,1HD]
Step 4/5: Audio and Subtitle configuration
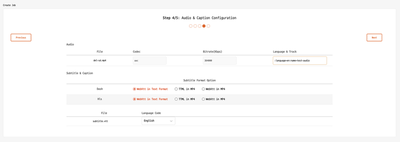
This step provides the following set of configurations. Codec and Bitrate of Audio is same as the source audio contents.
If additional audio or subtitle files were provided during the step 2/5, those would be displayed here.
Audio:
Language & Track: Audio track labels and audio language codes can be entered. (Example :lang=en:name=English Audio)
Subtitle:
Subtitle Format Option: Able to set output subtitle format option based on the Streaming Format during the step 3/5.
WebVTT in Text, TTML in MP4, WebVTT in MP4
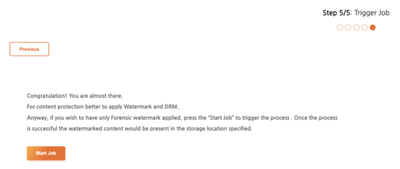
Step 5/5: Trigger Job
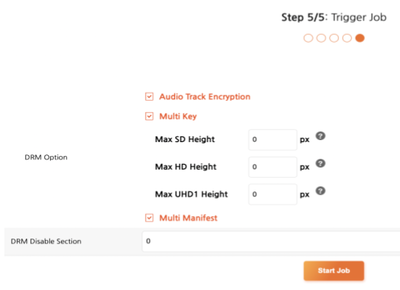
Audio Track Encryption: Enable or disable encryption of audio track (Enabling audio encryption may cause playback variations across different players).Multi Key: Apply multiple encryption key sets for each track. You can set different resolutions for each video track type. (SD, HD, UHD1)Multi Manifest: Create multiple manifest (playlist) files for multi-key packaging. For adaptive streams containing SD to UHD tracks, three manifests are created:SD_ONLY,SD_HD, andSD_UHD.DRM Disable Section: Apply clear(unencrypted) part at the beginning of the packaged content. Default: 0 (second)
If the job type is Transcode & apply Forensic Watermark, there would be no DRM setting option in the step 5 as shown below.
Step 4: Job Status & History
Once the job is triggered, the details of the job status can be viewed under the Job Status & History page.
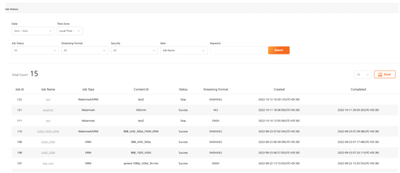
Search Conditions
Date: Weekly, Monthly, Yearly and Custom periodJob status: All, Fail, Progress, Success, Stop, QueuedStreaming Format: DASH, HLS, CMAFSecurity type: DRM, Forensic watermarkItem: Job name, Job Id, Content ID
Job Information
Job ID: The job ID entered during the job creation taskJob Name: The Job name provided during the job creation taskJob Type: Type of the job according to content security option (Watermark, DRM)Content ID: The content ID provided during the job creation taskStatus: Different status to be displayed are:queued,progress,success,fail,stopStreaming Format: Streaming Format as DASH/HLS or DASH, HLS, CMAF depending on the format selectedCreated: The job registration/creation date and time in UTCCompleted: The job completion date and time in UTC. It would be empty if the job in progress or queued.Detail: Provides the details of the job
Detailed Page
To view the detailed job description, click on the job name. The detailed view would be as follows:
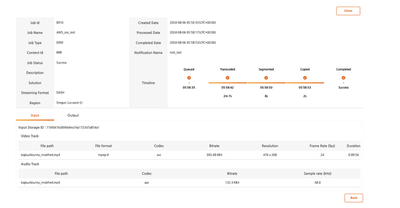
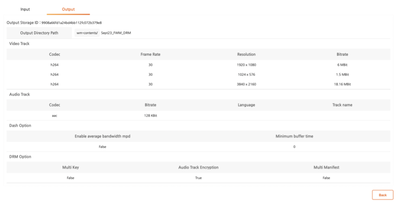
Click on Output tab to view output details such as the codec and resolutions.
AWS SNS support
The TNP service supports job status notifications using AWS SNS.
The steps to set up job notifications are as follows.
Step 1: AWS configuration
- Log on to your AWS console
- Navigate to SNS
- Create a topic i.e. Amazon SNS > topic > Create Topic > Select
Standard option - Note down the ARN and topic name
- Create a lambda
- Once lambda created note down the ARN of lambda
- Add sample code inside the lambda The following is an example of sending notifications to lambda using AWS SNS.
export const handler = async (event) => {
    console.log("!!!$$!======Event Received=====$$!!!")
    console.log('Received event:', JSON.stringify(event, null, 2));
    console.log("==============END============")
};
- Navigate back to the SNS Topic page and click create subscription
- Enter the protocol as AWS lambda
- Enter the ARN of the lambda noted in point #6
- Create the subscription
- Once subscription is created, check the connection in lambda
- Copy the ARN of the SNS topic as this would be required to configure on the DoveRunner server.
For more info about the AWS SNS check the page: https://docs.aws.amazon.com/sns/latest/dg/welcome.html
Step 2: SNS setup on DoveRunner console
- Login on the DoveRunner Console
- Navigate to Transcoding & Packaging->Notification Settings Tab
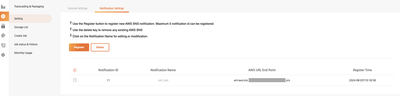
- Click on the Register button to create a new notification
- On the Register Notification Page, enter the details
Notification Name: Enter the notification name.Notification type: By default, it is set to SNS and cannot be modified (for future updates).Notification Status: Based on your requirement, select the notifications of interest.Notification Credential:AWS URL Endpoint: Enter the AWS SNS notification endpoint URL.AWS Access Key ID: Enter the AWS access key.AWS secret Key: Enter the AWS secret key.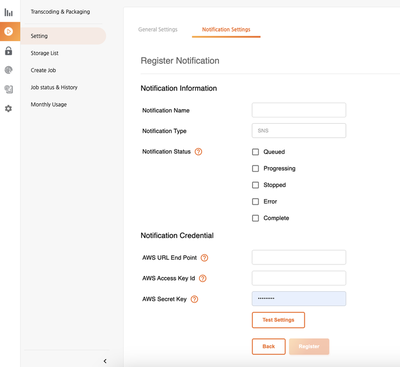
Test Settings: Click on the Test Settings button to confirm the entered credentials and details are correct.
Register:
Click on the Register button to confirm the changes; else, press the back button to cancel.
Delete SNS notification
Select the Notification ID you wish to delete.
Click the Delete button.
Editing Existing SNS Notification
- Click on the Notification Name of a particular ID you wish to edit.
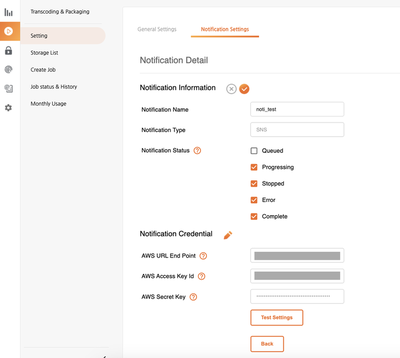
- Click on the Edit symbol (pencil icon).
- Enter the details, to confirm, Click the tick button,
- to revert changes, click the x button
- to navigate back, press the back button.
Once the changes are done, click the test settings to validate. Press the Back button to navigate to the previous screen.
Tips and Tricks
Stopping a triggered job
If you want to stop a job, click on the job ID in the Job status & History page. Then click on the Stop button to terminate the job.
Restarting a job
Once the job is stopped, you can restart it by clicking the Restart button in the job detail page.
Cloning a job
If you want to create a job with the same settings for multiple original content, click the Clone button on the detail page of the job you initially registered and change the input/output file in step 2/5. In subsequent steps, the same settings will be applied automatically, allowing you to create a job for the new content simply by clicking the Next button.
Next Steps
In order to play the output DASH, HLS or CMAF content on the client device, you need to refer to the following guide according to the applied security option to proceed with the integration.
- Multi DRM : License Integration Guide and Client Integration Guide
- Forensic Watermarking : Watermark Embedding Guide